Thursday, October 18, 2012

7 steps to a pretty painted pumpkin

So I'm not the biggest fan of Jack-O-Lanterns.  And to be honest Halloween is by far my least favorite holiday.

Don't hate me.

But I do love Fall!  I love the nice, fresh, crisp weather!  I love caramel apple cider!  I love pumpkin: pumpkin muffins, pumpkin spice creamer, pumpkin cake, YUM!

Needless to say, I don't like decorating for Halloween.  The stuff is just too scary.  And just not what I want surrounding my kids!  BUT, decorating for fall...that's another story!  It can be so beautiful!  And simple!

I came across this pin the other day and knew I wanted to try to make my own!!  We went to the "pumpkin farm" as my kids like to call it, last week and we got to bring home four pretty little pumpkins!  They were just BEGGING to be painted!!  See?

how to paint pumpkins


It was actually fairly simple!  They didn't turn out perfect but I am definitely okay with that!  Aren't these so much cuter than Jack-O-Lanterns?!

So here's what you do:

Step 1: Gather your pumpkins!  
See, I TOLD you this was easy!


Step 2: Gather your supplies!
If you'll notice, I have a white, yellow and weird orange color.  Let's just say the weird orange color was NOT what I was looking for, so I improvised (don't be afraid to improvise!) and used a light green instead!  I also have a sponge brush in the picture, but I only used the regular paint brush, it just felt easier to me!  Use whichever you like! 

 
 Step 3: Grab a pencil and sketch the design you want!
Can you see the really light lines on the pumpkin (left picture)?  I was doing the chevron stripe pumpkin here!  I started at the top and just did a star pattern around (right picture), then continued down making more lines.  It does NOT have to be perfect!  And if you mess up, you're using a pencil, so you can just fix it! 
 
Step 4: Now outline with pen!
I suppose this step is not necessary, but it's definitely helpful!  The pencil was so light, that I figured it would be kind of hard to paint over it.  Hence, the pen.  I just used a regular ball point pen.  It was kinda fun drawing on the pumpkins with the pen.  It's all smooth, and just, different!
 

Step 5: Paint!
Don't panic, you CAN do this!!  Pour your acrylic paints onto a plate.  I poured mine onto three little paper plates.  Paint one color at a time.  So do all your white paint first, on all your pumpkins.  Then go back and do the next color.  This allows some time for the paint to dry before you add the next color.  And if you decide one of the colors is, um, UGLY as all get out, go ahead and change colors like I did.  No biggie!

diy painted pumpkins
 
 Step 6: Add finishing touches!
My favorite pumpkin is the argyle one.  I just love it!! And it actually turned out way easier than I was thinking it would!  First you'll want to paint on your diamonds.  I cut out a paper diamond, then I put the paper diamond on the pumpkin and put little dots all the way around, to make sure I had the right size diamond!  Then I traced the diamonds onto the pumpkin!  After you paint them, you need to let the paint dry!  Now you're going to add your finishing touch!  I suppose you could use black paint for this, but that seemed really hard and messy to me!  So instead I grabbed a trusty Sharpie and used that for the little black lines!  To help make sure my lines were straight, I put little dots in the shape of a diamond so I would know where my lines should go (see picture below).  


Step 7: Put pumpkins on your porch or mantle and just LOVE their pretty-ness!


Photobucket


Tuesday, October 16, 2012

weight loss & an outfit

I hit a goal for my weight loss yesterday!!

Ready for this?

I'm down.....


30 POUNDS!!!

Who woulda thunk it?! Not me 30 pounds ago, that's for sure!  It's taken me, well, what seems like forever but in reality it's been about a year.  With some setbacks of course.  The last 20 came off just in the last 6 months probably.  It's exciting!  And motivating!

Oh....this is an outfit post too, huh?!  So here's how to take a really boring white tee, and make it feel fab!

A pretty red, flowery scarf!!

colored jeans outfit

Easy peasy!  And if you have a matching purse, even better.  You guys like my red pants?!  I've been searching high and low for some colored pants that were actually flattering and not nasty gross when I put them on, ya know, 'cuz I'm not a size 2!  And I finally found them, so I bought two, of course!  One in this pretty red!  And one in a dark teal-ish color (that's right, teal-ish!).  Love! They were at Kohl's and they're cords!  Double love!

how to dress up a white tshirt

how to wear a scarf


 shirt ($5): old navy, scarf ($4.48): target, red pants ($19.72): kohl's, steve madden flats ($7): sam's (who knew?!)

 Photobucket

Monday, October 15, 2012

worries into thanks

beach silhouette Pictures, Images and Photos

I've had a really hard, much dreaded week the last six days.  My stomach has been in knots for most of the six days.  My mind has been overrun with worry and anxiety.  My patience has been short and my love small.

What could be causing such a stressful week you ask? Two words.

Stomach.  Flu.

Wait, did she just say the stomach flu is causing knots in the tummy, worry, anxiety and a lack of patience and love?!

Yes.  Yes I did.

I have come to recognize an idol in my life.  I guess you could call the idol health.  But it's even more specific than that.  I don't mind coughs, sniffly noses, fevers....I can deal with those.  The stomach flu, I cannot.  I have an intense fear of it.  You may even call it a phobia.

You see, a few months back, I got the stomach flu for the first time since I was a kid.  Horrible stuff.  This stomach flu lasted for over a week.  And I haven't been the same since.  Seriously, I haven't been the same.  The flu changed something in me, so now I feel nauseous almost every evening.  Food doesn't sit well in my stomach.  I can't drink carbonated drinks anymore.  A stomach bug did this, you guys.  I didn't even know that was possible.

So now I have a phobia.  Of getting the stomach flu again and having things get worse.

Six days ago, two of my daughters woke up with the bug.  Then they were totally fine that afternoon.  Then the next day, 36 hours later, my oldest threw up again.  Freaked me out.  What is this thing that leaves and then dares to come back?!  It was pretty much a dreadful waiting game after that, just WAITING for the other two to get it.  I knew they had to get it, though I always held on to the slim hope that maybe, somehow, they would escape.

They didn't.

First one fell.  Then the other last night.

Why am I telling you all this?

I realize that some of you will think I'm crazy for "overreacting" to something as inevitable as a stomach bug.  But we all have our "thing" don't we?  That thing (or things) that drive us to insane worry.  That thing that causes us to lash out at our kids and husband for no reason.  For example, last night I caught the last standing healthy kid brushing her teeth with one of her sick sister's toothbrush.  I freaked out.  I caught myself yelling, "WHY are you doing that?!  We don't do that!!!"  Similar things came out of my mouth when catching them sharing cups.  "NOOOOO!!!!"  I'd shriek while telling them to switch their cups!! Don't you know that "YOU are the orange cup and YOU are the green cup?!"  Then I would realize that I was talking to 2-year-olds.  2-year-old twins.  They've shared everything since before birth.  They ALWAYS share drinks, we used to only have one toothbrush for both of them to use when they were babies....I mean, come on.  The poor things didn't know that mama turns into a nutcase when the stomach flu enters our house.

I was getting to the point of overwhelming worry.  It was making me sick to my stomach (and still does sometimes).  I decided I needed to quit trying to deal with this on my own (duh) and start doing what God tells me to do in His Word.  So I went back to a favorite passage of mine:

Philippians 4:6-8
Be anxious for nothing, but in everything by prayer and supplication with thanksgiving let your requests be made known to God. And the peace of God, which surpasses all comprehension, will guard your hearts and your minds in Christ Jesus. Finally, brethren, whatever is true, whatever is honorable, whatever is right, whatever is pure, whatever is lovely, whatever is of good repute, if there is any excellence and if anything worthy of praise, dwell on these things.

The first thing we are called to do is "be anxious for NOTHING."  I wish it was easy as reading it!  God doesn't leave us there though.  He tells us what to do INSTEAD of worrying.  Pray!!  Go to God with your worries and your requests.  Oh and don't forget the thanksgiving.  While you're talking to God, remember to be thankful.  There are always things to give thanks for.  

So I started doing that.  And you know that peace it promises?  It's real!  My heart has calmed down, my stomach has lost most of its knots!  I'm able to be thankful for the little things, like having a semi-calm and uneventful morning!  

When I start to dwell on the what-ifs, WHAT IF I get this nasty thing and can't get out of bed and J is working?  WHAT IF J gets it and can't go to work at all?  What if, what if?!  then I make myself think on the truth (verse 8) above.  I ask myself questions (really I do!).  Am I sick right now?  Is J sick right now?  And then I thank God that I'm feeling good and that J is feeling good.  

I know the real trial will be if I get sick too.  I will need to be thinking on the truth and trusting in God's grace to get me through.  He always provides what we need.  

Do you have a trial you're going through?  Are you worried about something?  Remember God's grace and mercy to us!  And obey His word: Be anxious for NOTHING!  Be thankful! 


  Photobucket

Friday, October 12, 2012

it's time for a fall outfit!

I love fall!! When you live in the southern part of the country like I do, Fall-ish weather is even more precious! You see, "fall" weather here means temps in the 80s, with maybe a few clouds in the sky!! If it rains....BLISS!!

So yesterday was a semi-overcast, looks like it MIGHT rain, kinda day! It didn't rain, but the boots and little jacket came out anyway!  


striped fall outfit


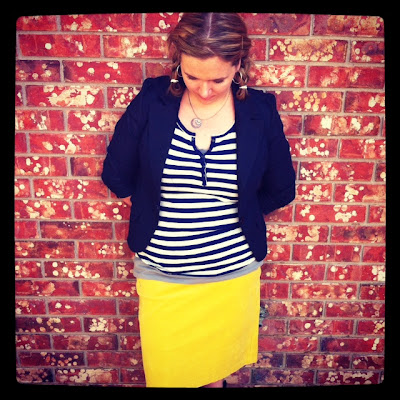
This yellow skirt you guys!  It's so my new fav!  It's a cord skirt, and it's kinda stretchy, so it's super comfy!  I just love yellow and I NEVER thought I'd hear myself say that!  But it's the best!  Kinda funky, kinda bright and definitely fun! 

This jacket is great for our kind of weather too, it's lightweight, with 3/4 length sleeves, so it doesn't look completely ridiculous in 85 degree weather!


yellow pencil skirt outfit
jacket--ross, striped shirt--old navy, yellow skirt--old navy, boots--old navy


  Photobucket

Wednesday, October 10, 2012

free give thanks printable

With Thanksgiving fast approaching, and Fall decorating in full swing, I thought it would be nice to do a little free Give Thanks printable!  So, here ya go!


give thanks free printable


thanksgiving free printable
 
 *Free printables are for personal use only! 

Photobucket 

Tuesday, October 9, 2012

pinterest loves--pumpkin bars to die for

I found this recipe on Pinterest a few days ago.  It was a life changing moment.  Did you know that Pumpkin Bars can be life changing?  I didn't either.  Until I made these.  

These pumpkin bars....are just heavenly!  They are moist.  And pumkin-y.  And cinnamon-y.  And just delicious.  I have a feeling you're gonna love them!   Oh and they're ridiculously easy, double score!! 


pumpkin bars recipe


Pumpkin Bars with Cream Cheese Frosting (print recipe)


Original recipe found here!  I tweaked it slightly to match our likes!)

2 cups flour
2 teaspoons baking powder
4 teaspoons cinnamon (I'm a crazy cinnamon freak so I doubled the cinnamon from the original recipe, just use 2 teaspoons if you're not a cinnamon freak too!)
1 teaspoon salt
1 teaspoon baking soda
4 eggs
1 and 2/3 cups sugar
1 cup oil
1 can (15oz) pumpkin (not pumpkin pie filling)
Preheat oven to 350 degrees.  Spray a 15x11 baking dish (if you don't have this size, a 13x9 would probably work, you'll just have to bake it longer).  
Mix the eggs, sugar, oil and pumpkin with an electric mixer or with your trusty KitchenAid.  Slowly add baking powder, cinnamon, salt, baking soda and then flour.  Mix well!  
Pour into the 15x11 dish and bake for 25-30 minutes.  
While the deliciousness is baking, make your frosting.

Cream Cheese Frosting 

1 8oz. package of cream cheese (I use Neufchatel to cut back on the calories a bit!  I've tried fat free before and it's pretty nasty in comparison so we don't do that anymore!)
1/3 cup softened butter
4 cups powdered sugar
2 tsp pure vanilla extract
1 Tbsp milk
Mix together all ingredients with an electric mixer or KitchenAid.  Beat until smooth and fluffy!  Resist the urge to eat it by the spoonful. 

Cut a piece of cake while it's still warm and slather the cream cheese frosting on it!  Savor every mouthful and maybe go back for a second piece! 


  Photobucket

Monday, October 8, 2012

style loves--my first outfit post

Well, here's my first *gulp*outfit post.

I'm thankful for the hubs, who has the ability to make me laugh, even in the most awkward situations, like, you know, when you're trying to "model" and not look like a complete idiot.

At least there was much laughter.  And no tears!  


Now I need to make a giant disclaimer here.  I am so NOT a model.  Or anywhere near it.  I'm probably about the size of 10 models, no joke.  I've had four kids, including twins, which pretty much ruined my body.  I was one of those preggos who didn't really care what I ate....as long as it tasted good, I was in!  And I am paying the price for those delicious decisions now!  BUT, I am losing weight.  Slowly, and I mean SLOOOOWLY, but surely, the weight is coming off!  Maybe someday I'll be brave enough to share my actual weight, but for now, I'll just tell you that I've lost 28 pounds and I have about 25 to go.  Gah. 

Anyway, I love fashion.  I love blogs about fashion. I  love magazines about fashion.  I love TV shows about fashion (You guys!  Did you watch Fashion Star last year?!  Best show, EVAH!).  I love hair fashion, clothes fashion, accessory fashion, nail fashion......it's all just, so pretty!

One of the best feelings in the world is going out and feeling nicely put together!  Sometimes I fail miserably at this.  I'll get home from my errands, look in the mirror again and go, "WHAT was I thinking?!  How did this outfit look so much better two hours ago?!"  Or I see a picture of myself and gag.

So you might see some of those outfit fails on here occasionally.  That's okay though.  I'm just a mom of four littles, rebelling against the idea of wearing sweats and a tshirt EVERY single day.  I'm also just an almost "regular" sized girl who's trying to not be afraid of style, or of taking pictures! 


how to belt a cardigan


striped cardigan
cardigan--Old Navy (last season), white tank--Old Navy, skinny jeans--Kohl's (last season), necklace--handmade by my bff, sunglasses--Kohl's


 Photobucket

Friday, October 5, 2012

pretty nails at home--dotted nails

I just love pretty nails! I love them so much that my toe nails haven't been unpainted since I was a kid.

No joke.

I love pedicures too.  But looking back, the only times I've gotten pedicures is for my wedding and the three times I was 9 months preggo and ready to pop!  Besides those few wonderful, blissful times, I've always done my nails at home.

Recently I came across a couple of blogs that talk a lot about doing pretty nails at home!  My favorite is The Beauty Department!  I lo-OVE it!  I could read it for hours, getting all kinds of pretty inspiration!

Anyway, I was in need of a toenail change, so I thought I'd see what I had and what I could come up with!

This is how they turned out:


how to do pretty nails at home

Pretty, no?!

And here are the simple little tools I used:


at home pedicure

Simple right?!  Three nail polishes: a darkish pink, a light pink and a white!  I also used the little sharp wooden stick thing.  Do those have a name?!  And a Q-tip!  You can use really whatever you have at home for your dots!  This is just what I happened to have!

Step 1: Paint your toenails the base color, in this case the dark pink!

Step 2: Use your Q-tip to make some light pink dots.  You can either pour out some light pink polish and dip the Q-tip into that, or just dip your Q-tip into the bottle, which is what I did!  I also only did dots on one side of my nail.  Just for fun!

Step 3: Use the pointy stick thing to make some smaller white dots.  Again, pour it out or just dip in the bottle!

Step 4: Let dry and then cover with a Top Coat sealer!

Step 5:  This step is a must!  Wear pretty flip flops and show off your cool new toes! 


Photobucket

Wednesday, October 3, 2012

busy bag ideas

I have twin girls that are two years old.
 
Need I say more?

Really........there isn't much else to say!  Ha!

Anyway.  I find that when I'm trying to do school with their older sisters, they want to be involved too.  Which usually means sneaky things like taking pencils or schoolbooks, scribbling on worksheets, etc etc.

SOOO, a solution!  BUSY BAGS!  They are all over the blogosphere right now but for some reason I kinda balked at the idea for a while.  No idea why.  I'm just a little slow I guess!  But now that the new school year has started, I've found the, uh, NEED to keep them busily entertained, preferably NOT getting into their sisters' schoolwork!   So I created some busy bags!  These are my two favs!  And of course I found the first one online, searching through other people's ideas!

Puff Ball Containers

busy bag puff balls

These little containers were way easier than I thought.  I was wondering how in the world people cut those holes in the middle of the lids....did I need my husband to do this for me?!  Am I going to need some sort of power tool-ish device?!  First I tried a hole punch, NOT so power tool-ish!  Which turned out to be a complete fail.  Then I grabbed my handy dandy sewing scissors (because I WISH I sewed, not because I actually do) and just poked into the plastic and cut a little hole.  Who knew it would be so easy?!  

I bought the puff balls at Hobby Lobby for about $1.47.  For 125 sweet little puff balls!  I need to be honest here about something....I think I might like this activity more than the girls....there's just something about popping that little ball through the hole........you'll see!

Pretty Ball Cups

busy bag ideas

You guys like my creative names?  Five points to whoever can think of something better than Pretty Ball Cups!!

This one is just simply simple!  And pretty!  While walking through Hobby Lobby, I looked down one of the bazillion Christmas aisles and saw these little bags of sparkly, glittery balls!  I walked in a trance down the aisle toward the white, silvery ones....then my eyes saw the beautiful pink, purple, blue and green ones and I just KNEW my girls would love them.  They were $6.99 minus 40%!  I bought a bag and then took them home, threw them in a bag with a couple styrofoam cups and "Voila!" another busy bag!!

So far the girls love the busy bags, even the big girls!  I'm still trying to figure out how to deal with everyone having a different bag though, because of course that doesn't work....everyone wants what the other one has and then they want what the other has, and then they want what the other one has again.  *sigh*  One thing at a time I guess! 

  Photobucket

Tuesday, October 2, 2012

diy loves--chalkboard clipboards

Having four little girls, our house produces a LOT of coloring pages! I mean, like, we probably go through about a tree a day in paper!

The problem is what to do with all the masterpieces?!  I feel bad just tossing them in the trash!  But let's be honest!  There are only so many scribble sheets a Mama can keep!

So I saw this idea on Pinterest and knew I had to try it!  It's so simple!  Go buy (or use one you already have) a clipboard (or 4 if you're me!).  I got the wood looking ones...you know, not the plastic ones!  Plastic might work too but I thought the wood (or whatever it is) would work better! I got my clipboards for $1.99 at Target!  Also buy a foamy brush and some chalkboard paint like this:


I bought my chalkboard paint at Hobby Lobby.  It was $3.99 I think and I used my 40% off coupon on it!  Cheap!!  Then, spread something paintable on your surface.  I used a Target bag.  That's right, classy!!  Then paint your clipboard.  How easy is that?  I just painted the front of the clipboard, I left the sides and back their pretty brown color.

Oh and I almost forgot!!  Buy some pretty ribbon or fabric that matches the decor in your house!  I bought an 1/8 of a yard of damask-y fabric and cut it into four strips.  It adds a little pretty, see?


diy chalkboard paint ideas


Now tell your kids to color to their heart's content!  Each one has a clipboard, that doubles as a chalkboard, to hang their masterpieces from!  My oldest love drew a picture of our family.  An artist in the making: 


You can also leave little notes on them!  How fun is that?  


  Photobucket